As an early Christmas gift, I was suckered into buying two 2TB hard drives the instant I heard they were $90 apiece on Newegg (it so happens that 2TB drives are $70 apiece for Black Friday sales). They were destined to go into the first of my four Dells that I got from the Stata Loading Dock a while back for my media and archive server. My plan was to install ArchLinux on the drives, but with a twist: I wanted to install a software RAID 1; that is, to have the drives be perfectly mirrored at any instant in time. Sure, such a setup is overkill for one person, especially without any critical data, but setting one up would be good experience.
Obviously the first step in setting up any storage array is to install the hardware. Since these Dells do not have a second SATA port, I had to either (a) use an adapter to convert SATA to IDE or (b) get a second SATA port. Step A was easier at the time I got the drives because I had already picked up two SATA->IDE adapters from a Reuse posting. Strangely the adapters did not work in the Dells, but worked perfectly fine on my quadbox. Luckily, a week later Bayley found a 4-port SATA PCI card and generously gave it to me. I installed it in the Dell, plugged in both drives, and fired up the machine. It worked! Surprisingly, the Dell reports the drives as IDE drives. Strange.
Now it is time to install Arch. Having not a clue as to where to start, I Googled some guides. The first article that I got was an install guide on Arch's wiki and it was rather long and was not trying to do what I wanted to accomplish. However, it was a start, and I felt confident enough to work my way through it.
On my first attempt, I followed all the instructions, only forgetting to add the "mdadm" and "lvm2" hooks before the "filesystem" hook in mkinitcpio.conf. I think everything else in the setup process went fine. Then I rebooted the machine, which seemed to be fine until the OS decided to fall back to the ramfs. Uh oh. This was my first time working in a castrated (and borked) Linux; I was shocked when "halt" and "reboot" did not work. I hit ctrl-d to logout, which proceeded to induce a kernel panic. Derp.
Evidently the install failed somewhere. On my later takes, I tried manipulating the commands, and sooner or later I began to understand what each of them did. I also learned (more or less the hard way) that formatting a 2TB disk takes approximately five minutes. Google proved helpful in collecting further resources; some other webpages that I read included a Ubuntu mdadm RAID1 thread, Arch RAID0 thread, and mdadm stop/delete array thread. Unfortunately, none of them ended up helping me set up a working RAID1 array. Double derp.
After two weeks of on-and-off work and trivial progress, I got rather frustrated, stressed, and upset. My self-imposed deadline of Thanksgiving crept faster and faster, which put more pressure on me to get this stupid thing working. I decided to try one last time on the eve of Thanksgiving, hoping that something would work out. It didn't. Grub decided to be annoying, and when I got Arch to partially load after copying the Grub files onto the boot partition, Arch decided to fall back to the ramfs and proceeded to kernel panic. Blah. I finally relented and installed Arch on one disk and set up the other disk as a vault for incremental backups, which took less than half an hour. *mega sigh of relief*
Although this most definitely is not a RAID1 array, it is still a decent alternative for redundant storage. As for learning how to set up software RAIDs in Linux, I'll probably do that on another machine during IAP (another name for January, in which we have no classes), when I'm not Battlecoding, cramming for Linear Algebra or Differential Equations, or churning out PSETs for Intro to C++.
tl;dr Setting up (uncommon) configurations on Linux + deadline in the near future = major stress. I totally do not want to do IT-related work as a career.
UPDATE: So somehow Bayley sort of talked me into installing Ubuntu Server on the box because Ubuntu Server has a nice RAID configuration utility. Plus, Ubuntu Server is not as bloated as the regular Ubuntu. I suppose with 2TB of disk space I should not be fussing about an extra 150MB or so. Hmmm....
24 November 2010
23 November 2010
Steve Jobs loves Coldplay?
Today, in writing class, we presented our favorite music videos in class. One of them was "Life in Technicolor II" by Coldplay. The song's initial instrumental melody immediately reminded me of the Apple MacBook Pro (Unibody) promotional video.
Life in Technicolor II:
Apple MacBook Pro video:
Well it is true that the one billionth song purchased on iTunes was "Speed of Sound" by Coldplay (the lucky purchaser won a 20" iMac, ten video iPods, and $10,000 in iTunes credit).
Life in Technicolor II:
Apple MacBook Pro video:
Well it is true that the one billionth song purchased on iTunes was "Speed of Sound" by Coldplay (the lucky purchaser won a 20" iMac, ten video iPods, and $10,000 in iTunes credit).
20 November 2010
Bit Hacks are Awesome
What does this code do?
float super_mario_bros(float number)
{
   long i;
   float x2, y;
   const float threehalfs = 1.5F;

   x2 = number * 0.5F;
   y  = number;
   i  = * ( long * ) &y;
   i  = 0x5f3759df - ( i >> 1 );
   y  = * ( float * ) &i;
   y  = y * ( threehalfs - ( x2 * y * y ) );
// y  = y * ( threehalfs - ( x2 * y * y ) );

   return y;
}
18 November 2010
BMW is tricky
Putting the backup camera behind the trunk logo? Now that's creativity! =D

The car in question is the 2012 650i, which recently debuted at the Los Angeles auto show.
Photo credits: Car And Driver
The car in question is the 2012 650i, which recently debuted at the Los Angeles auto show.
16 November 2010
I'm Still Alive...I think!
Hey folks,
Apologies for the lack of movement/posts in the last week or so. Another week of exams/projects is coming up, so I don't have the luxury of heading to MITERS on Friday nights to tinker around. Actually, I don't have time to break from studying or coding to mess around with the display, which happens to be sitting a mere foot behind me. :/ So yeah, in short, life at MIT is very busy!
What I've been up to recently: learned Cilk, an x86 parallel programming platform invented by my professor, Charles Leiserson (the tech has been acquired by Intel last year). I used it to optimize a graphical screensaver (6.172 Project 4 [pdf], if you're curious).
I also got my hands on two very sexy pieces of hardware:
 Awwww, so cute :3
I'll write some brief notes about the iMac, even though you are probably more excited to hear about the MacBook Air. The iMac boots Mac OS X 10.2.8, but since I didn't have the password accounts to any of the existing accounts, I found a hack to let me get in by making a new account with admin rights. All you have to do is boot into single user mode, remove /var/db/.AppleSetupDone, and reboot! The Mac will think this is the first time the computer has been booted, so it will go through the traditional setup process. After approximately five minutes, I had my own account with admin privileges! =D What an easy and terrifying exploit. So much for `security' in older Mac OS X versions ;)
Besides that, the Mac has a 1GHz G4 processor, 256MB RAM (though easily upgradeable considering the vast amount of DDR RAM sitting in my drawers), and a semi-spacious 80GB disk. I theoretically could dump one of my many disks currently sitting in my dresser into it. That might make a good Thanksgiving project.
In other news, I am teaching three Splash classes: Bit Hacks by myself, and two bridge classes, Probability in the Game of Bridge and a Menagerie of Bidding Systems, with my partner-in-crime Brian Hamrick. Lecture notes and slides will be posted for your enjoyment :)
And finally, Math Prize for Girls was this past Saturday. Congratulations to all! The score distribution was much better than that of last year, with a tie in 3-5 and a ten-way tie for 8th place. The competition (and the fact that I got a MacBook Air not too long ago) reminded me of my [very silly and naive] vow if I had won the competition last year (going to the nearby Apple store to buy ten decked-out MacBook Airs immediately following the competition).
In any case, happy hacking!
Apologies for the lack of movement/posts in the last week or so. Another week of exams/projects is coming up, so I don't have the luxury of heading to MITERS on Friday nights to tinker around. Actually, I don't have time to break from studying or coding to mess around with the display, which happens to be sitting a mere foot behind me. :/ So yeah, in short, life at MIT is very busy!
What I've been up to recently: learned Cilk, an x86 parallel programming platform invented by my professor, Charles Leiserson (the tech has been acquired by Intel last year). I used it to optimize a graphical screensaver (6.172 Project 4 [pdf], if you're curious).
I also got my hands on two very sexy pieces of hardware:
- a 13.3" MacBook Air 1.86/4/128/320m as a replacement for my 4.5-year-old, trusty Core Duo MacBook Pro (2.0/2/160GB Intel G2/X1600). Expect a review within the next week.
- a 15" iMac G4, courtesy of Bayley (the dumpster diver) =D

I'll write some brief notes about the iMac, even though you are probably more excited to hear about the MacBook Air. The iMac boots Mac OS X 10.2.8, but since I didn't have the password accounts to any of the existing accounts, I found a hack to let me get in by making a new account with admin rights. All you have to do is boot into single user mode, remove /var/db/.AppleSetupDone, and reboot! The Mac will think this is the first time the computer has been booted, so it will go through the traditional setup process. After approximately five minutes, I had my own account with admin privileges! =D What an easy and terrifying exploit. So much for `security' in older Mac OS X versions ;)
Besides that, the Mac has a 1GHz G4 processor, 256MB RAM (though easily upgradeable considering the vast amount of DDR RAM sitting in my drawers), and a semi-spacious 80GB disk. I theoretically could dump one of my many disks currently sitting in my dresser into it. That might make a good Thanksgiving project.
In other news, I am teaching three Splash classes: Bit Hacks by myself, and two bridge classes, Probability in the Game of Bridge and a Menagerie of Bidding Systems, with my partner-in-crime Brian Hamrick. Lecture notes and slides will be posted for your enjoyment :)
And finally, Math Prize for Girls was this past Saturday. Congratulations to all! The score distribution was much better than that of last year, with a tie in 3-5 and a ten-way tie for 8th place. The competition (and the fact that I got a MacBook Air not too long ago) reminded me of my [very silly and naive] vow if I had won the competition last year (going to the nearby Apple store to buy ten decked-out MacBook Airs immediately following the competition).
In any case, happy hacking!
08 November 2010
Apple Display Hack Followup
Here is a link to the original post: http://doesntexistat.blogspot.com/2010/11/hacking-apple-studio-display.html
Intro, Power Supply
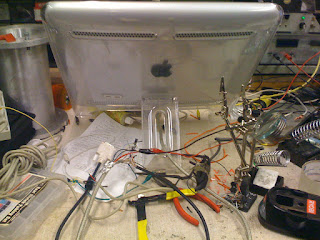
So this past week was exams week, which means that I did not get much time to work on the project. After exams were over on Thursday night, I opened the 24V 1.5A power supply that I got from ebay! The cute power supply is pretty small; about the size of 5x7 photograph. There are terminals for AC +, AC -, AC Gnd, 24V +, and 24V -; you unscrew a screw which secures a plate, which in turn sandwiches the wire in the middle of said plate and the power supply unit itself. I then stripped one of my many computer power cords so I could use a 3-pronged plug. Most 3-prong plugs have black as L (line), white as N (neutral), and green as ground. No soldering or nonsense was needed to wire, since the only effort to wire up the system was unscrewing five screws and inserting the wires in between the plates and the unit itself. Before I wired up the monitor power cables to the power supply (and after I had attached the AC power cord), I measured the output with a voltmeter, and sure enough, it read 24.5V! Perfect.
Wonky Connections
I then wired up the monitor, plugged in the setup, and powered on the system. Sure enough, the monitor came to life! Upon closer inspection, I noticed some pixels that were spazzing green (i.e. flashing green and the proper color). This was probably a problem with the cable connection; I smacked the mess of wires and the number of spazzing pixels reduced.
The spazzing goes away if I squeeze the proper connections. This confirms that some connections are loose. I can temporarily fix the problem by holding the connections with a binder clip, but will resolder and/or reshrink the connections once I get a soldering iron in my room. There is no way I am lugging the monitor 1 mile across campus again.

USB & Hotplug
Apparently USB was always working. I finally tested it today with an Apple USB mouse. It's good to know that the monitor extracts/produces/ the +5V required internally. I still have yet to figure out hot-plug support (I guess it is a matter of soldering two wires together).
Display Brightness
I hadn't really thought about this until I skimmed through the bit-tech thread for the clean version of this hack. As all Apple display owners know, the brightness is controlled through software (System Prefs on a Mac), and the button on the display is more or less an app launcher for System Preferences. I confirmed that pressing the button works -- it brings up System Prefs to the Display pane. Dragging the display brightness does change the brightness!
Other people mentioned that the display will draw significantly current at a high brightness than at a low brightness. When I tested the display (at full brightness) with the lab power supply, it drew less than 1.5A, so no worries there.
Breakout Box
I thought about making a breakout box as the true solution to this problem. I was fortunate to find a video card with a female ADC port in the dumpster. In theory, I could desolder that, create my own PCB board, and solder the necessary parts on (female ADC port, female DVI port, connection to power supply, USB cable). Unfortunately, desoldering the ADC port from the video card was crazy evil (especially at 12:30am), so I stopped working on it for the evening. Perhaps the desoldering tool needs a smaller head (it was one of those powered heat+vacuum tools). I will give it another shot when I return to MITERS.
Miscellaneous
One of my friends also got a 15" version of this monitor and creatively mounted it on his bunk bed after stripping off the acrylic (which is equivalent to unscrewing seven hex screws). He is also planning to do this hack! I am happy.
Feedback and Q&A
I also read much of the feedback to this hack. Thanks all who appreciated it. I do realize that this hack is not original (in fact I did not claim to be the first one to have done so since I linked to someone's pinout guide in the main post), but I do claim that this is my first hack. I do want to congratulate WarriorRocker for his very clean and Apple-esque Apple Studio Display hack.
Now, to answer some questions/feedback:
Q: ...pinouts.ru...
A: Yes, I'm well aware of it. However, soldering the pins on the plug to wires is tricky, and since this is my *first* time soldering, I'd rather do something more manageable. I'm sure the hack will be a lot easier had I just connected corresponding pins with wires. Thanks anyway!
Q: I happen to be attempting the same thing and I seem to be running into a snag. The only video connections I've made are the 8 which come off the board - Clock +/-, TMDS 0+/-, TMDS 1+/-, and TMDS 2+/-. Is there anything else that is necessary for DVI to work that I'm missing? Also, I'm using a 24V 4A power supply, could the amperage be too high? The power button lights up and pulses but I don't even see a flicker on the screen.
A: Yes, you are missing DDC Clock (ADC pin 9) and DDC Data (ADC pin 19). Your power supply should be more than fine; the monitor is rated for 50W.
Q: Other Pins <=> Colors on the DVI fragment
Is there any number pin number?
Dvi or adc pin number ?????
A: The DVI pin numbers are on the left of the chart. Basically that chart was a listing of all the leftover wires after I had soldered everything according the the main chart. Apologies if that was unclear.
Again, a big thanks for all who thoroughly read through the post and appreciated it!
Intro, Power Supply
So this past week was exams week, which means that I did not get much time to work on the project. After exams were over on Thursday night, I opened the 24V 1.5A power supply that I got from ebay! The cute power supply is pretty small; about the size of 5x7 photograph. There are terminals for AC +, AC -, AC Gnd, 24V +, and 24V -; you unscrew a screw which secures a plate, which in turn sandwiches the wire in the middle of said plate and the power supply unit itself. I then stripped one of my many computer power cords so I could use a 3-pronged plug. Most 3-prong plugs have black as L (line), white as N (neutral), and green as ground. No soldering or nonsense was needed to wire, since the only effort to wire up the system was unscrewing five screws and inserting the wires in between the plates and the unit itself. Before I wired up the monitor power cables to the power supply (and after I had attached the AC power cord), I measured the output with a voltmeter, and sure enough, it read 24.5V! Perfect.
Wonky Connections
I then wired up the monitor, plugged in the setup, and powered on the system. Sure enough, the monitor came to life! Upon closer inspection, I noticed some pixels that were spazzing green (i.e. flashing green and the proper color). This was probably a problem with the cable connection; I smacked the mess of wires and the number of spazzing pixels reduced.
The spazzing goes away if I squeeze the proper connections. This confirms that some connections are loose. I can temporarily fix the problem by holding the connections with a binder clip, but will resolder and/or reshrink the connections once I get a soldering iron in my room. There is no way I am lugging the monitor 1 mile across campus again.

Setting up a ghetto dual screen setup in the middle of a dorm (Random Hall) kitchen warrants weird looks!
USB & Hotplug
Apparently USB was always working. I finally tested it today with an Apple USB mouse. It's good to know that the monitor extracts/produces/
Display Brightness
I hadn't really thought about this until I skimmed through the bit-tech thread for the clean version of this hack. As all Apple display owners know, the brightness is controlled through software (System Prefs on a Mac), and the button on the display is more or less an app launcher for System Preferences. I confirmed that pressing the button works -- it brings up System Prefs to the Display pane. Dragging the display brightness does change the brightness!
Other people mentioned that the display will draw significantly current at a high brightness than at a low brightness. When I tested the display (at full brightness) with the lab power supply, it drew less than 1.5A, so no worries there.
Breakout Box
I thought about making a breakout box as the true solution to this problem. I was fortunate to find a video card with a female ADC port in the dumpster. In theory, I could desolder that, create my own PCB board, and solder the necessary parts on (female ADC port, female DVI port, connection to power supply, USB cable). Unfortunately, desoldering the ADC port from the video card was crazy evil (especially at 12:30am), so I stopped working on it for the evening. Perhaps the desoldering tool needs a smaller head (it was one of those powered heat+vacuum tools). I will give it another shot when I return to MITERS.
Miscellaneous
One of my friends also got a 15" version of this monitor and creatively mounted it on his bunk bed after stripping off the acrylic (which is equivalent to unscrewing seven hex screws). He is also planning to do this hack! I am happy.
Feedback and Q&A
I also read much of the feedback to this hack. Thanks all who appreciated it. I do realize that this hack is not original (in fact I did not claim to be the first one to have done so since I linked to someone's pinout guide in the main post), but I do claim that this is my first hack. I do want to congratulate WarriorRocker for his very clean and Apple-esque Apple Studio Display hack.
Now, to answer some questions/feedback:
Q: ...pinouts.ru...
A: Yes, I'm well aware of it. However, soldering the pins on the plug to wires is tricky, and since this is my *first* time soldering, I'd rather do something more manageable. I'm sure the hack will be a lot easier had I just connected corresponding pins with wires. Thanks anyway!
Q: I happen to be attempting the same thing and I seem to be running into a snag. The only video connections I've made are the 8 which come off the board - Clock +/-, TMDS 0+/-, TMDS 1+/-, and TMDS 2+/-. Is there anything else that is necessary for DVI to work that I'm missing? Also, I'm using a 24V 4A power supply, could the amperage be too high? The power button lights up and pulses but I don't even see a flicker on the screen.
A: Yes, you are missing DDC Clock (ADC pin 9) and DDC Data (ADC pin 19). Your power supply should be more than fine; the monitor is rated for 50W.
Q: Other Pins <=> Colors on the DVI fragment
Is there any number pin number?
Dvi or adc pin number ?????
A: The DVI pin numbers are on the left of the chart. Basically that chart was a listing of all the leftover wires after I had soldered everything according the the main chart. Apologies if that was unclear.
Again, a big thanks for all who thoroughly read through the post and appreciated it!
02 November 2010
Hacking the Apple Studio Display
I acquired a circa 2002 17" Apple Studio Display LCD in good condition from my friend and dumpster-diver-buddy Bayley Wang. The monitor is one of the top-notch 17" monitors: (Hey, it retailed for $999!) it has a superb IPS, or in-plane switching panel for unmatched color quality even by today's semi-professional standards (pros probably want 10- or 12-bit panels now). Unfortunately, this unit has an Apple Display Connector, or ADC, plug instead of the more standard DVI plug. On the flip side, the ADC is simply DVI + USB + 25V, so I could hack the monitor to use DVI! I looked on Google for previous hacks, but the only relevant documentation was a post and a PDF on the Apple discussion forums describing the ADC pinouts and their DVI equivalents. Having nothing better to do, I decided to splice a spare DVI plug onto the monitor!

I began by cutting off the ADC plug from the single wire the came out the back of the monitor and then proceeded to strip off the rubber sheath, cut off shields, and strip the internal cables. The actual cables were 26-gauge wires -- they were very thin and looked very fragile! I used a magnifying glass to help peel off the shielding. Some of the internal wires were grouped and additionally shielded; I exposed them at a shorter length to prevent cable confusion (there were multiple cables of the same color). I repeated the process for the DVI cable: first cutting it in half, then stripping the wires, and finally stripping the wires which were enclosed in a further layer of shielding. Stripping all the cables took a good hour and a half.


The next item in our agenda was to find out which wires corresponded to which pins on the DVI wire fragment. I was not quite sure what to do initially, but a MITER gave me the following tip: Apparently the ohmmeter has the nice property of displaying some odd (i.e. zero) resistance when the positive and negative leads are connected without resistance. I tested all the pins and all the wires and constructed the following charts (note: these colors may be different for your DVI cable!):

Main correspondence table
t. = twisted
(color1, color2) = color1 is in the same shielded group as color2
Other Pins <=> Colors on the DVI fragment
single = not in a shielded group
Male DVI-D (single link) pin numbers:
The --- pins represent unused pins; these pins are for dual link connections only.
I was left waiting for quite a bit because I didn't know how to solder and one of the MITERs who graciously volunteered to teach me, Dane, was busy with his project. After he was done, he soldered one of the wires on the monitor end with the corresponding wire on the DVI cable fragment while I watched from the side. Then he placed a heatshrink over the freshly soldered wire and blew it with a heat gun to prevent the conjoined wire from shorting the other wires. I then sat down for what seemed to be an hour and concentrated on soldering all the pairwise wires. The end product was a great big mess; Charles Guan, the MITERS god, felt sick to his stomach just by looking at it! Everyone doubted that my hack would work, but I had a sliver of hope that my first real electronics project would succeed.


After I was finished, I showed Dane the end result. He suggested that I should solder the shields (the naked wires in the shielded groups), too. I finished soldering rather quickly, heatshrinked them, and reported back to Dane. We then connected the monitor to the lab power supply, dialed it to the Apple-specified 25V, and connected the alligator clips to the red and black wires on the monitor. Dane touched the capacitative power button, which pulsed at the touch. I connected the monitor to my laptop, went into System Preferences, and hit `Detect Displays.' The monitor then came to life in mirror mode!! My five hours of hard work paid off!


Other notes:
EDIT[2]: Here is a followup of the hack: http://doesntexistat.blogspot.com/2010/11/apple-display-hack-followup.html
EDIT[3]: Here it is in action: lame dual display and insanely excellent triple display

Hacker food = McDonald's. Yup.
I began by cutting off the ADC plug from the single wire the came out the back of the monitor and then proceeded to strip off the rubber sheath, cut off shields, and strip the internal cables. The actual cables were 26-gauge wires -- they were very thin and looked very fragile! I used a magnifying glass to help peel off the shielding. Some of the internal wires were grouped and additionally shielded; I exposed them at a shorter length to prevent cable confusion (there were multiple cables of the same color). I repeated the process for the DVI cable: first cutting it in half, then stripping the wires, and finally stripping the wires which were enclosed in a further layer of shielding. Stripping all the cables took a good hour and a half.


The next item in our agenda was to find out which wires corresponded to which pins on the DVI wire fragment. I was not quite sure what to do initially, but a MITER gave me the following tip: Apparently the ohmmeter has the nice property of displaying some odd (i.e. zero) resistance when the positive and negative leads are connected without resistance. I tested all the pins and all the wires and constructed the following charts (note: these colors may be different for your DVI cable!):

Main correspondence table
| ADC color | DVI Pin & Color (if none, function) |
|---|---|
| 2x thick red | +25V |
| 2x thick black | Gnd |
| very thin dark brown | C5 |
| very thin orange | LED |
| light blue | 7 yellow (single) |
| yellow | 6 white (single) |
| green (twisted w/ white) | USB D+ |
| white (twisted w/green) | USB D- |
| black (near USB Data) | USB return |
| light brown (t. w/ white) | 24 white (white, blue) |
| white (t. w/ light brown) | 23 blue (white, blue) |
| white (t. w/ orange) | 2 red (red, pink) |
| orange (t. w/ white) | 1 pink (red, pink) |
| pink (t. w/ white) | 9 brown (yellow, brown) |
| white (t. w/ pink) | 10 yellow (yellow, brown) |
| white (t. w/ black) | 18 green (green, black) |
| black (t. w/ white) | 17 black (green, black) |
t. = twisted
(color1, color2) = color1 is in the same shielded group as color2
Other Pins <=> Colors on the DVI fragment
| 11 | naked w/ yellow, brown |
| 16 | light brown (single) |
| 14 | dark brown (single) |
| 15 | black (single) |
| 3 | naked (red, pink) |
| 22 | naked (blue, white) |
| 19 | naked (green, black) |
single = not in a shielded group
Male DVI-D (single link) pin numbers:
| C5 | 8 | 7 | 6 | --- | --- | 3 | 2 | 1 |
| 16 | 15 | 14 | --- | --- | 11 | 10 | 9 | |
| 24 | 23 | 22 | --- | --- | 19 | 18 | 17 |
The --- pins represent unused pins; these pins are for dual link connections only.
I was left waiting for quite a bit because I didn't know how to solder and one of the MITERs who graciously volunteered to teach me, Dane, was busy with his project. After he was done, he soldered one of the wires on the monitor end with the corresponding wire on the DVI cable fragment while I watched from the side. Then he placed a heatshrink over the freshly soldered wire and blew it with a heat gun to prevent the conjoined wire from shorting the other wires. I then sat down for what seemed to be an hour and concentrated on soldering all the pairwise wires. The end product was a great big mess; Charles Guan, the MITERS god, felt sick to his stomach just by looking at it! Everyone doubted that my hack would work, but I had a sliver of hope that my first real electronics project would succeed.


After I was finished, I showed Dane the end result. He suggested that I should solder the shields (the naked wires in the shielded groups), too. I finished soldering rather quickly, heatshrinked them, and reported back to Dane. We then connected the monitor to the lab power supply, dialed it to the Apple-specified 25V, and connected the alligator clips to the red and black wires on the monitor. Dane touched the capacitative power button, which pulsed at the touch. I connected the monitor to my laptop, went into System Preferences, and hit `Detect Displays.' The monitor then came to life in mirror mode!! My five hours of hard work paid off!

IT WORKS!!11!!oneone!

Mess of cables
Other notes:
USB does not work. I'll get that working this week. [EDIT] A friend suggested that the monitor might internally make the +5V required for usb, so I'll have to test it this week at MITERS since I don't have the power supply in my dorm.USB does work -- see the follow-up.- Hot-plug display detection doesn't work. I'll get that working this week.
- I will consider making a breakout box instead of hacking the monitor cable. One of these adapters costs a whopping $99 from Apple!
- The monitor runs fine on 24V and draws slightly more than 1A -- no need for 25V. I have already ordered a 24V 1.5A regulated power supply from ebay.
EDIT[2]: Here is a followup of the hack: http://doesntexistat.blogspot.com/2010/11/apple-display-hack-followup.html
EDIT[3]: Here it is in action: lame dual display and insanely excellent triple display
Subscribe to:
Posts (Atom)